Monday, April 19, 2010


CHOCOLATE MUG CAKE

1 Large Coffee Mug
4 tbl Flour
4 tbl Sugar
2 tbl Cocoa
1 Egg
2 tbl Milk
3 tbl Vegetable Oil
1 splash of Vanilla

1. Spray mug with cooking spray. Mix all the dry ingredients in the mug in the order they are given. Add the egg and mix. Then add the remaining ingredients and mix well.
2. Place the mug in the microwave and cook on high for about 3 minutes. The cake will rise up over the top but don't worry. Allow the cake to cool and then eat with a spoon right out of the mug or tip out onto a plate. Enjoy!

The best part of the site I found this on was that they were calling it "The Most Dangerous Cake in the World". Why, you ask? Because you can have it almost anytime, anywhere. It turns something that should seem like chore into something that can be done from start to finish during commercial break! Give it a try and impress yourself and your friends with this fun new dessert. :)

Fruit Tart


In honor of the wonderfully welcomed change in the weather, I decided to post something a bit more spring time appropriate this week. One of my absolute favorite things to make for parties or birthdays during the spring and summer months is a fruit tart. I just started making them about two years ago, but throughout that time I have come to find that this is by far the best. It is a normal tart crust, filled with an amazing white chocolate cream filling, and then topped with your fruit of choice. This dessert will stun even the most seasoned chef with its amazing look and even more amazing melt-in-your-mouth flavor!

WHITE CHOCOLATE FRUIT TARTS

CRUST:
3/4 c Butter
1 1/2 c Flour
1/2 c Powdered Sugar

FILLING:
1 pkg White Chocolate Chips, melted
1/4 c Heavy Whipping Cream
8 oz Cream Cheese
Assortment of Fruit for Decorating

GLAZE:
3 tbl Sugar
2 tsp Corn Starch
1/2 tsp Lemon Juice
1/2 c Pineapple Juice

1. In a small bowl, cream together the butter and powdered sugar until fluffy. Slowly add the flour and mix well. Press into the bottom of one large tart pan or many individual sized ones. Bake at 300 degrees for about 20 minutes or until golden brown. DO NOT OVERCOOK!
2. For the filling, mix the melted chips and cream in a small bowl. Add the cream cheese and beat until smooth. Spread over the crust up to the top. Use your assortment of fruit to decorate the tops in patterns and flavors you will enjoy.
3. For the glaze, combine the sugar and cornstarch in a small saucepan. Stir in lemon and pineapple juice until smooth. Bring to a boil over medium heat and stir until thick. Let it cool then brush over the top of the fruit.

If any of you ACTUALLY need something easy, fun, and very impressive, please give these a try. They always turn out great and are so much fun to decorate with friends or family. It is a great recipe to have on hand for summer BBQs or picnics. Don't be afraid to get crazy with the kinds of things you use to decorate them with. Since the filling is white chocolate based, it goes great with almost anything. Personally, I like to do them in individual tart pans because then it makes decorating them a group experience and also allows for more experimentation. Also, don't try to be calorie conscious and leave out the glaze. It is the key to making them look perfect and it will also help to preserve the fruit so it doesn't dry out. Have fun!

Sunday, April 4, 2010

Sugar Cookies


Easter, like most holidays now days, is always filled with all kinds of delicious treats. Not that I'm complaining, I'm always up for a little something sweet! I thought in celebration of the holiday I would share my favorite recipe for sugar cookies. Sugar cookies are such a staple treat that anyone who enjoys spending time in the kitchen should be able to make. They can come in handy on almost any occasion considering they can be shaped into anything and decorated with almost all colors and flavors. Roll some out and get creative!

SUGAR COOKIES
1 1/2 c Butter
2 c White Sugar
4 Eggs
1 tsp Vanilla
5 c Flour
2 tsp Baking Powder
1 tsp Salt

1. In a large bowl, cream together the butter and sugar. Add eggs one at a time and vanilla. Stir in the flour, baking powder, and salt. Cover and refrigerate for at least 1 hour.
2. Preheat oven to 400 degrees. Roll dough out onto a floured surface 1/4 to 1/2 of an inch thick. Use shaped cookie cutters or just a round cut-out to shape cookies.
3. Bake 6 to 8 minutes or until the cookies start to turn golden. Let them cool completely and ten decorate as you desire.

I made some of these today with my family and, I must say, decorating them is just too much fun! We made a big batch of white frosting and just dyed it all different colors; pink, purple, green, and yellow! After we made a huge mess, we had an overabundance of little bunnies, eggs, and flower cookies and they are still taking up quite a bit of counter space. Next time you need a fun activity and a tasty treat, I would definitely suggest trying these out!

Tuesday, March 16, 2010

Irish Soda Bread


In honor of the upcoming holiday, I decided to give you a recipe for a traditional Irish treat. Soda Bread! This is a pretty simple bread recipe given to me by my grandmother who is so Irish it's just plain silly. She would always make it around St. Patrick's Day and I thought I would as well.

IRISH SODA BREAD

3 cups all-purpose flour

1 tablespoon baking powder

1/3 cup white sugar

1 teaspoon salt

1 teaspoon baking soda

1 egg, lightly beaten

2 cups buttermilk

1/4 cup butter, melted


1.Preheat oven to 325 degrees F (165 degrees C). Grease a 9x5 inch loaf pan.


2.Combine flour, baking powder, sugar, salt and baking soda. Blend egg and buttermilk together,

and add all at once to the flour mixture. Mix just until moistened. Stir in butter. Pour into prepared

pan.

3.Bake for 65 to 70 minutes, or until a toothpick inserted in the bread comes out clean. Cool on a

wire rack. Wrap in foil for several hours, or overnight, for best flavor.


Make it today and you'll have a great surprise for your friends and family when tomorrow comes


around! I hope you enjoy it.

Tuesday, March 2, 2010

English Muffins


Considering most of my posts are usually the kind of thing we, as semi-conscious eaters, try to avoid on a daily basis, I thought this week would be a good time to include something you can have fun making everyday without the guilt afterwards. English muffins are actually a healthy alternative in the mornings to toast and especially to bagels. They are good with jam, peanut butter, and, my personal favorite, fried eggs.

ENGLISH MUFFINS

1 c Milk
2 tbl White Sugar
1 pkg Active Dry Yeast
1 c Warm Water(110 degrees)
1/4 c Melted Shortening
6 c Flour
1 tsp Salt

1. Warm the milk in a small saucepan until it bubbles and then remove from heat. Dissolve in the white sugar and then let cool until lukewarm. In a small bowl, dissolve the yeast into the warm water until creamy or for about 10 minutes.
2. In a large bowl, mix 3 c flour, milk mixture, yeast, and shortening. Beat until smooth. Add the salt and enough of the left over flour to make a soft dough. Knead for a few minutes and then place in a greased bowl, cover, and let rise until almost doubled in size.
3. Punch down the dough and roll out to about 1/2 inch thick. Cut into about 2 1/2 in rounds and dust both sides with cornmeal. Place onto a wax paper, cover, and let rise for another 1/2 hour.
4. Heat greased griddle and cook each muffin for about 10 minutes on each side or until golden brown. Allow to cool and serve right away or store in a plastic bag.

I love, love, love english muffins and these ones definitely made the top of my list. Since they are homemade, you are given the chance to experiment with different flavors and ingredients just like the scones I made a few weeks ago. Adding raisins and cinnamon give you another classic variation of the english muffin or adding fruit and nuts could lead you to your new favorite! Personally, I enjoy mine with eggs and cheese so normally I stick to the classic. The only tip I would suggest is replacing the all-purpose flour with some whole wheat flour. Just like most baked goods, it is easy to give your creation a little bit more nutritional value by simply adding some flax, wheat germ, or oat bran. It definitely does change the texture but usually for the better.

Monday, February 22, 2010

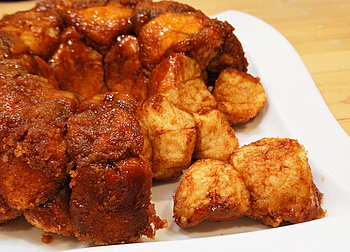
Monkey Bread


I got this recipe from my grandma years ago. She would always make it for my brothers and I when we were little and we just couldn't get enough. It isn't the most nutritious treat but it is the perfect thing to make for those occasions that only come around a few times a year that call for an indulgent breakfast. It requires no more experience to make than boxed cake so even if you are brand new to the world of baking, you can impress your friends and family with this fabulous classic!

MONKEY BREAD

3 pkgs Frozen Biscuit Dough
3/4 c White Sugar
2 tsp Cinnamon
1/2 c Butter
1 c Brown Sugar
1/2 c Chopped Walnuts(optional)
1/2 c Raisins(optional)

1. Preheat the oven to 350 degrees and grease a pan with the shape of your choice.
2. Mix the white sugar and cinnamon together in a plastic bag. Cut the biscuit dough into cubes and shake 6 to 8 pieces together at a time in the sugar mixture. Place the pieces in the pan as you go and continue until all the dough has been covered. If you choose to use the nuts or raisins, make sure to spread them as you place the dough in the pan to make sure the are evenly dispersed.
3. In a small saucepan, melt the butter and brown sugar together. Boil for one minute and then pour over the dough in the pan.
4. Bake in preheated oven for 30-35 minutes. Let the bread sit in the pan for at least 10 minutes and then turn out onto a cooling rack.

One of my favorite things about this is it is so family friendly. Adults love it because it is a simple treat and kids love it because its sugary and really fun to eat! There is no need to cut this bread. Just let it cool and put it on a serving dish and it pulls right apart. This is another one of those posts where there is not much you can do to make it healthier but like I said, thats what makes it fun for those times of year that don't come around too often. It is also a really fun activity to do with friends because everyone can help do something and then you all get to enjoy it together!

Tuesday, February 16, 2010

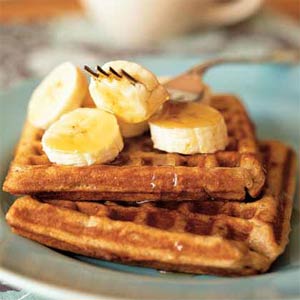
Waffles


What does every person love to wake up to in the morning? A delicious and hearty breakfast.... like waffles! Waffles are a super easy way to make a daily routine seem a little more fun even without a special occasion. There are so many ways to top waffles and they go with everything, which is why they are one of my personal favorites.

WAFFLES

2 Eggs, beaten
1 c Milk
1/4 c Canola Oil
1/4 c Apple Sauce
1 1/2 tsp Vanilla
1 c Whole Wheat Flour
1/4 c Wheat Germ
1/2 c All-Purpose Flour
1/4 c Flax Seed Germ
4 tsp Baking Powder
1 tbl Brown Sugar
1/4 tsp Salt

1. In a large bowl, mix together the eggs, milk, applesauce, and vanilla. Beat in remaining ingredients until smooth.
2. Preheat a waffle-iron and coat well with cooking spray. Pour in about 1/4 c of batter for each segment(may be different for different irons). Cook until golden brown and crispy.
3. Remove from waffle-iron and serve immediately. Cover with desired toppings and enjoy.

One of my favorite things about this recipe is that it is already so healthy! Most of the suggestions I would have normally suggested, have already been adapted into this specific recipe. Unfortunately, when talking about a breakfast food like waffles, it is so easy to negate all the health benefits bywhat is put on top. Creating a nice mixture of chopped apples, cinnamon, and a little brown sugar can give you a delicious alternative to syrup without adding too any calories or sugars.

Tuesday, February 9, 2010

Pretzels


One of my favorite parts about going to the mall when I was younger was the special treats we would get. Not the clothes or new shoes but the pretzels. The big, chewy pretzels you can only get when you go out shopping. At least until now. This recipe duplicates mall pretzels perfectly. The texture, the color, and even the shape! They are surprisingly easy, especially if you have any experience with making bread products of any kind.

PRETZELS
1 pkg Active Dry Yeast
2 tbl Brown Sugar
1/8 tsp Salt
1 1/2 c Warm Water
3 c Flour
1 c Bread Flour
2 c Warm Water
2 tbl Baking Soda
2 tbl Butter
2 tbl Kosher Salt

1. In a large bowl, dissolve the yeast, brown sugar, and salt into 1 1/2 c warm water. Stori in flour and knead until smooth and elastic or about 8 minutes. Place in a greased bowl and let rise for about 1 hour.
2. Combine 2 c warm water and baking soda into an 8 in square pan.
3. After the dough has risen, cut it into 12 equal pieces. Roll each piece into a pencil thin rope that is about 3 feet long. Twist into a pretzel shape and dip into the baking soda solution. Place on a parchment covered pan and let rise about 20 minutes.
4. Bake at 450 degrees for about 8-10 minutes or until golden brown. Brush with melted butter and sprinkle with course salt, garlic, or cinnamon sugar.

With bread recipes, there is little that can be done to improve the nutritional profile of the food considering yeast can be so temperamental. However, with the recipe I suggest simply trying different toppings and get creative!

Monday, February 1, 2010

Carrot Cake


Carrot cake is such a great dessert. Even though it's all in my head, knowing I'm eating vegetables in my cake is such a nice concept. Cakes, however, are never easy to bake. There are so many different factors that effect how a cake will turn out. Over the years I have learned that carrot cakes are one of the easiest and most likely to turn out well.

CARROT CAKE

4 Eggs
1 1/4 c Vegetable Oil
2 c White Sugar
2 tsp Vanilla
2 c Flour
2 tsp Baking Soda
2 tsp Baking Powder
1/2 tsp Salt
2 tsp Ground Cinnamon
3 c Grated Carrots
1 c Chopped Pecans

1. Preheat your oven to 350 degrees and grease and 9 x 13in baking pan.
2. Beat together Eggs, Oil, Vanilla, and Sugar. Mix together Flour, Baking Soda, Baking Powder, and Salt. Slowly add the dry ingredients into the Egg mixture. Fold in Carrots and Pecans.
3. Pour into pan and bake for about 40 minutes or until an inserted toothpick comes out clean. Let cool in the pan for at least 10 minutes and turn out onto a cooling rack.
4. After the cake is completely cooled, frost with your favorite frosting!

I love this recipe! It is so, so, so easy and leaves you with a wonderful and delicious cake. A few simple changes to this recipe and you'll have yourself an even healthier treat.
First, I added an extra 1/4 c Flour, but only because of high altitude. This helps keep the cake from being to spongey and dense.
Second, I like to sift all the dry ingredients together before mixing them into the Eggs. This helps give the cake a little more assistance in not turning out to dry and dense.
Third thing I did was to decrease the amount of White Sugar to 1 cup and then add 1/2 a cup of Brown Sugar as well. Brown sugar has a stronger flavor so you can get more taste out of a lesser amount.
Last but not least, I added a few extras. I added 1/4 cup of ground Flaxseeds to boost the nutritional profile. There was no major flavor change with this at all. Since the recipe already calls for nuts, the flavor of the Flaxseed just blended right in.

Tuesday, January 26, 2010

Brownies

Brownies are a personal favorite of mine, but they are most definitely not the easiest thing to make from scratch. In fact, few recipes turn out as well or even as close to as good as this one. When you can figure out how to make a good batch of homemade brownies, you've got a fantastic treat that will please any crowd.


Chocolate Fudge Brownies

1/2 c Butter
1 c White Sugar
2 Eggs
1 tsp Vanilla
1/3 c Cocoa Powder
1/2 c Flour
1/4 tsp Salt
1/4 tsp Baking Powder

1. Preheat oven to 350 degrees and grease an 8 x 8 in baking pan.
2. Melt Butter and mix in Sugar and Vanilla. Add the Eggs very slowly.
3. Combine Flour, Cocoa, Salt, and Baking Powder. Combine all the dry ingredients with the Butter mixture until smooth. Spread into greased pan.
4. Bake in preheated oven for 20-25 minutes. DO NOT overcook.

These brownies are fabulous. As long as you make sure not to overcook them, they will come out moist and chewy which is exactly how a good brownie should be. Normally I try to improve the nutritional profile of my recipes, but with brownies it's just too dangerous. They are too delicate of a pastry to remove the butter or sugar without completely sacrificing the integrity of the desert. I suggest sticking to the recipe when it comes to these treats!

Chocolate Chip Cookies

As a staple treat for most people during their childhood and throughout life as an adult, chocolate chip cookies are the perfect treat and so easy to make. They are such a great comfort food and appropriate, not to mention accepted, on every occasion. For the inexperienced baker, I would definitely suggest giving this recipe a try.

CHOCOLATE CHIP COOKIES

2 c Flour
1/2 tsp Baking Soda
1/2 tsp Salt
3/4 c Butter, Softened
1 c Brown Sugar
1/2 c White Sugar
1 tbl Vanilla
1 Egg
1 Egg Yolk
1 c Chocolate Chips
1 c Walnuts

1. Preheat your oven to 350 degrees. Sift together Flour, Baking Soda, and Salt and set aside.
2. Cream together the Butter, Brown Sugar, and White Sugar until completely smooth. Add Vanilla and Egg. Add the second Egg Yolk and beat well.
3. Mix in sifted ingredients just until blended. Add Chocolate Chips and Walnuts until all the ingredients are well integrated.
4. Drop by the spoonful onto a greased cookie sheet. Bake in pre-heated oven for about 15 minutes or until they start to brown.

These chocolate chip cookies are just too good. They bake up beautifully due to the extra egg yolk and brown perfectly thanks to the brown sugar. I have been experimenting with different cookie recipes, such as this one, for a long time now. Mostly my goal is to be able to bake a great cookie with less butter and sugar and without compromising too much texture or flavor. After many, many tries, I have discovered a few secrets worth giving a shot.
First, replace some of the butter with apple sauce. I usually do about half of what the recipe calls for. This changes little in terms of flavor and all it does to the cookie's texture is make it a bit more cakey.
Second, I usually cut back the sugar a bit. It is important to note that sugar is responsible for the crusty outside that cookies have. Taking about 1/2 a cup out of a recipe like this one will eliminate a lot of sugary calories and have little effect on the flavor.
Last but not least, the easiest way to add a bit of nutrition to a cookie is to put things instead of trying to take things out. Adding some ground flaxseed adds some Omega-3, oatmeal offers a bit of insoluble fiber, or even some grated apples for some fruity vitamins.
Whether you choose to make the changes or keep the recipe the same, you can't go wrong with a chocolate chip cookie!

Simple Scones


Scone are a simple but tasty treat that is good for a quick breakfast or an afternoon tea party. There are so many different kinds of scones available, that it would seem silly to make just one variety. Here is a recipe for a basic scone that can be modified to any personal taste.

SIMPLE SCONES

2 c Flour
1/3 c Sugar
1 tsp Baking Powder
1/4 tsp Baking Soda
1/2 tsp Salt
8 tbl Butter, Frozen
1/2 c Sour Cream
1 Large Egg

1. Heat your oven to 400 degrees. Mix all the dry ingredients together VERY WELL.
2. Cut butter into pieces and mix in with a pastry mixer. Dough will be very crumbly, like course meal.
3. In a separate bowl, mix together the egg and sour cream. Mix into flour mixture with a fork until dough becomes elastic.
4. Turn dough out onto a floured surface and knead for about a minute until it is easy to shape. Form the dough into a circle and cut diagonally into 8 pieces.
5. Bake for about 15-20 minutes or until golden brown.

I love this recipe. I have tried many times to make homemade scones and it is very hard to get the right texture, but not with this. The come out with a fantastic crusty outside and a soft center, which is exactly what we want. After trying the original recipe, I decided to try and make a few adjustments.
First thing I always like to try is replacing sour cream with plain yogurt. It cuts down the fat while still providing the right texture. In this case, it worked perfectly!
The other thing I did was change the way they were formed. When I first made these, it was for an afternoon get together and just wanted something for people to snack on so instead of just cutting one batch into 8 pieces, I divided the dough in half and made 16 small scones. The only thing to note here is that with smaller scones you will need to reduce the bake time to about 10-15 minutes.
Now in terms of the different varieties of scones you can make, the possibilities are endless. I like to add about 3/4 c of chocolate chips to a batch for a nice dessert scone. Another good idea is to add 1 c dried blueberries and the zest of 1 lemon. This is a perfect breakfast scone that has a great fresh flavor.
Those are just some simple suggestions but get creative! Adding your favorite fruit or flavor might just unveil a treat that you'll be making for years.